Controlling Dust During Home Renovation in North Vancouver
Controlling dust during home renovation requires a combination of physical containment, ventilation management, and a clear plan for cleanup once the work is done. For homeowners in North Vancouver and the North Shore undertaking major renovations, poor dust management can affect the health of everyone living in the home, contaminate HVAC systems, and push cleanup costs higher than expected. A contractor who plans for dust from the start will protect both the finished work and the people living around it.
Key Takeaways
- Physical containment barriers between work zones and living areas are the single most effective tool for limiting dust spread.
- Negative air pressure systems draw dust toward filtration rather than letting it migrate through the home.
- Older North Shore homes may contain materials such as vermiculite insulation or legacy drywall compounds that require specialist handling before any demolition begins.
- HVAC systems should be sealed or isolated during renovation and professionally cleaned before being returned to normal operation.
- Post-renovation air quality testing can confirm whether the home is safe to fully occupy, particularly for households with children, seniors, or respiratory conditions.
- The cleanup phase deserves its own schedule and budget, not an afterthought at the end of the project.
Things You Must Know
1. Older Homes on the North Shore Can Contain Hidden Hazards
Many homes in North Vancouver and West Vancouver were built before materials regulations changed significantly. Vermiculite insulation, older textured ceiling coatings, and certain legacy building products may contain hazardous fibres that become airborne the moment demolition begins. Before any major renovation proceeds, a pre-demolition assessment is worth arranging with a qualified professional who can identify what materials are present and whether specialist remediation is required.
2. Your HVAC System Is a Dust Highway
Construction dust that enters an unsealed HVAC system can circulate through every room in the home for months after the project ends. Sealing return and supply vents in the work zone, and isolating the system from active dust-generating work, prevents this. Plan a full duct cleaning before the system returns to normal operation, regardless of how well the containment barriers performed during construction.
3. Containment Quality Varies Significantly Between Contractors
A plastic sheet taped loosely across a doorway and a properly pressurised containment zone are not the same thing. Ask your contractor specifically how they plan to manage dust containment, what filtration equipment they use, and how they protect finished areas of the home. A contractor who can answer those questions in detail before work starts is demonstrating a level of planning that protects both the build quality and your household.
Why Dust Management Matters More Than Most Homeowners Expect
Renovation dust is not a single substance. Depending on what is being demolished or built, airborne particles can include fine concrete and drywall dust, wood fibres, silica from cutting masonry or tile, fibreglass from insulation batts, and in older homes, legacy materials that require careful handling. Each of these carries different health implications and different cleanup requirements.
Crystalline silica dust, produced when cutting concrete, brick, tile, or stone, is classified as a human carcinogen. Sustained exposure above established occupational limits is linked to silicosis, a permanent and progressive lung disease, and according to OSHA’s occupational health guidance, even short-duration high-exposure events during renovation are considered a risk factor.
For homeowners staying in the home during a major renovation, the risks compound over weeks or months of active construction. Poor indoor air quality from sustained dust exposure can cause irritation symptoms in healthy adults and more serious effects in people with asthma, allergies, or compromised respiratory function.
How to Build an Effective Dust Containment Plan
Dust control begins at the planning stage, not on the first day of demolition. A proper plan addresses physical containment, air pressure management, filtration, HVAC protection, and the sequence in which different trades enter the site.
Step-by-Step: Setting Up Dust Control for a Major Renovation
- Pre-demolition assessment. Before any walls come down, identify materials that may require specialist handling. This includes testing for hazardous materials in homes built before the mid-1990s.
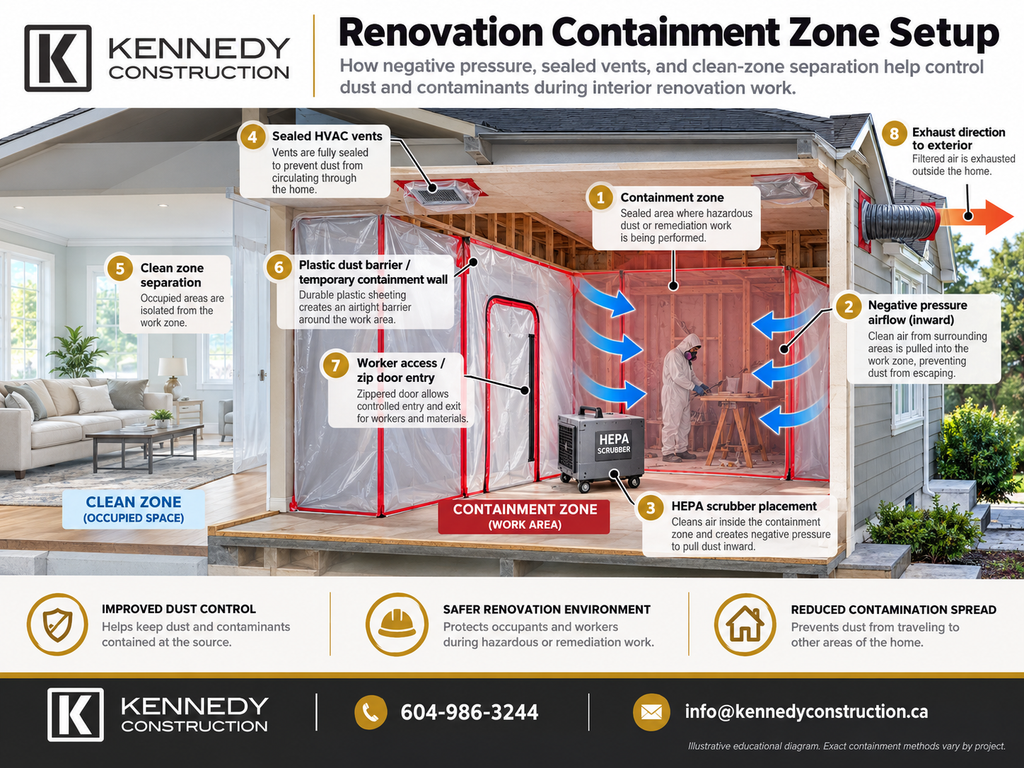
- Seal and isolate the HVAC system. Cover all supply and return vents in the work zone with plastic sheeting and tape. Consider a complete system shutdown during peak dust-generating phases if the renovation allows.
- Establish physical containment barriers. Use 6-mil polyethylene sheeting secured with proper framing or adhesive tape to create a sealed envelope around the work area. Install a zipper door for regular access without breaking the seal.
- Set up negative air pressure. Place a HEPA-filtered air scrubber inside the containment zone exhausting air to the exterior. This creates lower pressure inside the zone, so air flows inward rather than outward into the occupied home.
- Protect finished surfaces and adjacent rooms. Furniture, flooring, and cabinetry in adjacent areas should be covered or relocated. Gaps under doors and around penetrations should be sealed.
- Establish a clean and dirty zone protocol. Workers should remove or cover site footwear before entering the occupied home. Tools and materials should stay within the containment zone whenever possible.
- Schedule daily and phase-end cleanups. HEPA-filtered vacuums should be used throughout the project. Compressed air blowdowns distribute dust rather than removing it and should be avoided inside the containment zone.
- Post-construction air quality verification. Before removing containment and returning the space to full use, consider testing indoor air quality to confirm particulate levels have returned to an acceptable range.
Choosing the Right Equipment for Dust Control
The equipment your contractor deploys directly affects how much dust escapes the work zone. A HEPA air scrubber rated for the size of the containment space is the standard expectation on any substantial residential project. HEPA filters capture particles down to 0.3 microns, which covers most of the fine dust produced by drywall cutting, sanding, and demolition work.
| Equipment | Primary Function | Best Used For |
| HEPA Air Scrubber | Filters airborne particles; creates negative pressure | Any enclosed demolition or renovation space |
| HEPA Vacuum | Removes settled dust without redistributing it | Daily site cleanup and final post-renovation clean |
| Containment Barriers | Physically separates work zone from living areas | All active renovation phases |
| Dust Shrouds / Tool Attachments | Captures dust at the point of generation | Grinding, cutting, and sanding tasks |
| Pre-filter and Carbon Stage | Captures larger particles and VOCs before HEPA stage | Projects involving adhesives, coatings, or solvents |
How North Shore Homes Affect Dust Control Planning
Homes in North Vancouver, West Vancouver, and surrounding North Shore communities vary considerably in age, construction method, and layout. A rancher from the 1960s and a 1990s split-level present very different dust management challenges compared to a newer build. Older homes tend to have more unsealed cavities, uninsulated attic hatches, and open ceiling chases that allow dust to migrate between floors.
Homes built before 1990 in British Columbia have a significantly higher likelihood of containing materials that are now regulated or restricted, including certain insulation types, textured ceiling coatings, and floor tile adhesives. WorkSafeBC warns that asbestos can be found in most B.C. homes built before 1990, and as WorkSafeBC’s awareness campaign makes clear, professional pre-demolition testing is the standard recommended practice before renovation work begins on these properties.
The North Shore’s temperate but damp climate also plays a role. Renovation work that opens up wall cavities or roofing during wetter months can introduce moisture alongside dust, which creates conditions for mould growth if not managed carefully. Moisture control during renovation and dust control are closely related planning considerations on any major project here.
For homeowners undertaking a renovation to improve indoor air quality, there is a clear tension: the construction process itself temporarily degrades the air quality you are ultimately trying to improve. A contractor with a detailed site management plan can minimise that gap between demolition and the final healthy living environment.
Common Dust Control Mistakes to Avoid
- Using a regular shop vacuum instead of a HEPA-filtered unit. Standard vacuums exhaust fine particles back into the air rather than capturing them, making the problem worse.
- Leaving HVAC vents unsealed during active demolition. Even a short period of unprotected duct exposure can distribute fine particles throughout the entire home.
- Relying on a single layer of plastic sheeting with no pressure management. Without negative air pressure, any gap in the containment barrier allows dust to push outward into the rest of the home.
- Skipping pre-demolition hazardous material testing in older homes. Discovering a problem mid-demolition is more disruptive and costly than identifying it beforehand.
- Treating post-renovation cleanup as a quick sweep and mop. Fine dust settles on surfaces, inside cabinet interiors, on top of beams, and inside light fixtures. A proper post-renovation clean takes dedicated time and the right equipment.
- Not communicating the dust plan to all trades on site. Containment protocols only work when every person on the job understands and follows them consistently.
What to Expect from Post-Renovation Cleanup
Post-construction cleaning for a major renovation typically involves multiple stages: a rough clean focused on debris removal, a detail clean covering surface wipe-down including above-ceiling fixtures and inside cabinetry, and a final clean for a polish and inspection-ready finish. As industry guidance on post-construction cleaning phases notes, the timeline and cost vary depending on the scope of the project and the level of containment maintained during construction.
A well-managed site should require less intensive post-construction cleaning, but it will still require a thorough and methodical process. HEPA vacuuming of all surfaces before any damp wiping prevents fine particles from being smeared across walls and cabinetry. HVAC duct cleaning should follow after the general clean is complete and before the system is turned back on.
| Cleanup Stage | What It Covers | Timing |
| Rough Clean | Debris, offcuts, packaging, excess materials removed | During and at end of active construction |
| Detail Clean | HEPA vacuum all surfaces including high fixtures, shelves, inside cabinets | After trades complete, before final finishes |
| HVAC Clean | Professional duct cleaning and filter replacement | After detail clean, before system restart |
| Final Clean | Polish, wipe-down of all surfaces, floor finishing | Before occupancy or final inspection |
Frequently Asked Questions
How do you keep dust down when renovating?
The most reliable approach combines physical containment barriers around the work area, a HEPA-filtered air scrubber running under negative pressure, sealed HVAC vents, and daily cleanup with HEPA vacuums. Dust shrouds on cutting and grinding tools capture particles at the source before they become airborne. No single measure is sufficient on its own; the methods work together as a system.
How do you prevent dust from spreading during a home improvement project?
Preventing spread starts with isolating the work zone completely from the rest of the home. Sealed plastic barriers with a proper zipper door, combined with negative air pressure inside the zone, ensure that air flows inward toward filtration rather than outward into living areas. Establishing a clean and dirty zone protocol for workers and their equipment reinforces the physical barriers throughout the project.
How do you get rid of dust after a home renovation?
Post-renovation dust removal requires a staged approach. Start with HEPA vacuuming of all surfaces, including above door frames, on top of cabinets, and inside light fixtures, before any damp wiping begins. Follow with a professional HVAC duct clean before restarting the system. For households with health sensitivities, an indoor air quality test after the clean can confirm that particulate levels are within a safe range before full occupancy resumes.
How do you reduce dust during construction?
Reducing dust at the source is the most effective strategy. Use wet-cutting methods where possible for tile and masonry, attach dust shrouds to grinders and sanders, and avoid dry sweeping in favour of HEPA vacuuming. Scheduling the most dust-intensive phases, such as drywall cutting and sanding, as discrete blocks rather than interleaved with other trades also makes containment easier to manage.
Is renovation dust harmful?
Renovation dust can carry genuine health risks depending on what materials are being disturbed. Fine silica dust from cutting concrete, tile, or stone is a regulated carcinogen at sustained exposure levels. Fibreglass fibres from insulation cause skin and respiratory irritation. Older homes may contain materials that require specialist removal rather than standard renovation practices. People with asthma, allergies, or compromised immune function are more vulnerable to the effects of elevated dust exposure, and extended exposure in an occupied home deserves serious planning attention.
Planning a Renovation That Protects Your Home and Your Household
Dust control is not a minor site management detail. On a major renovation, it shapes the health of everyone living in the home during construction, protects the quality of finished work, and affects how smoothly the transition from construction site to completed home proceeds. A contractor who treats it as a core planning consideration, not a cost to minimise, is protecting your investment at every stage.
A.W. Kennedy Construction has been managing large-scale residential renovations across North Vancouver, West Vancouver, and the wider North Shore for over 20 years. The team’s approach to site management reflects the same standards applied to every other aspect of the build: planned in advance, communicated clearly, and executed by a crew that understands how all the pieces connect.
If you are planning a major renovation and want to understand how the project will be managed from start to finish, contact Kennedy Construction to discuss your project. The conversation starts with your goals and works backward through the planning, so nothing important gets left out.
