How to Reduce Noise Between Rooms During a North Shore Home Renovation
The most effective way to reduce noise between rooms during a renovation is to address the walls, floors, and ceilings as a connected system rather than tackling each surface in isolation. Acoustic insulation, decoupled framing, and resilient channels work together to block both airborne sound (voices, music) and impact noise (footsteps, objects dropping). In older North Shore homes especially, where framing is often single-layer and insulation minimal, a major renovation is the right window to get this right the first time.
Key Takeaways
- Sound travels through walls, floors, and ceilings simultaneously, so treating one surface while ignoring the others produces limited results.
- The two types of noise to address are airborne sound (conversations, TV) and impact noise (footsteps, dropped objects), each requiring different methods.
- Decoupling framing from the structure, sealing gaps, and adding mass are the three highest-impact actions in any noise-reduction scope.
- A whole-home or large-scale renovation is the best opportunity to build acoustic performance in from the start, before drywall goes up.
- North Shore homes built before the 1990s often have no insulation between interior partitions, making renovations a significant acoustic upgrade opportunity.
- Acoustic performance can be layered into energy efficiency upgrades without adding significant cost when planned early in the project.
Things You Must Know
1. Timing Determines Your Options
Once drywall is installed, your acoustic options shrink considerably. Decoupled framing, dense-pack insulation, and resilient channels all require open walls to install properly. If you’re planning a large-scale renovation and noise between rooms is a concern, flag it before framing begins, not after the finishes are in. Adding acoustic treatment after the fact typically means tearing out walls you’ve already paid to finish.
2. Gaps Undermine Everything Else
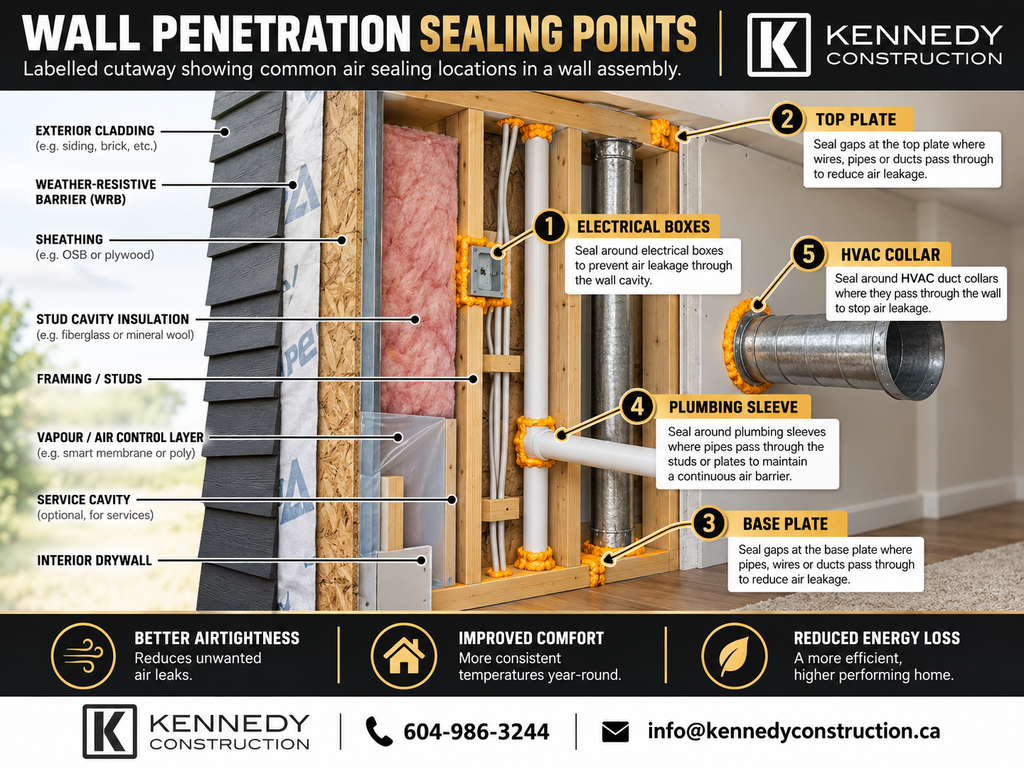
A wall with excellent Sound Transmission Class (STC) ratings can fail completely if there are small gaps around electrical outlets, plumbing penetrations, or where the wall meets the ceiling. Sound follows the path of least resistance, and even a 1% gap in a surface can account for a significant portion of sound leakage. Acoustic sealant and proper detailing at all penetrations matter as much as the insulation itself.
3. STC Ratings Have Real-World Limits
STC ratings are measured in controlled lab conditions. Real-world performance is almost always lower due to flanking paths, construction gaps, and building geometry. When a contractor or product sheet quotes an STC rating, treat it as a ceiling, not a guarantee. The goal during planning is to build in multiple layers of protection so that real-world performance still meets your expectations.
Why Older North Shore Homes Struggle with Noise
A significant portion of homes in North Vancouver, West Vancouver, and surrounding communities were built between the 1950s and 1980s. Construction standards at the time focused on structural integrity and basic thermal performance. Acoustic separation between rooms was rarely a design priority.
These homes commonly share a few characteristics that make noise transfer worse: single-layer drywall on interior walls, no insulation between bedrooms or floors, and framing that connects directly to both sides of the wall assembly. Each of these creates a path for sound to move freely from one space to another.
According to acoustic assembly data, a standard interior wall — two sheets of ½-inch drywall separated by wood studs with no insulation — provides an STC rating of 33, which provides almost no soundproofing. A well-constructed acoustic wall assembly using double-stud framing, insulation, and multiple drywall layers can reach STC 55 to 65, at which level even loud speech is difficult to hear.
A whole-home renovation that opens walls, reconfigures layouts, or adds a second storey is an opportunity to build acoustic performance into the structure permanently. The work is already disruptive; the incremental cost of adding the right materials during that window is a fraction of what retrofit work would cost later.
The Core Methods for Reducing Noise Between Rooms
Add Mass to Wall Assemblies
Sound needs energy to vibrate a surface. Heavier walls require more energy to move, which means less sound passes through. Adding a second layer of drywall, using thicker drywall, or incorporating mass-loaded vinyl (MLV) between layers are all practical ways to increase wall mass during renovation framing.
Standard drywall is 12.7mm (½”). Upgrading to 15.9mm (⅝”) Type X drywall, or doubling up layers with a damping compound between them, noticeably increases mass without major structural changes.
Decouple the Framing
When a wall’s framing connects rigidly to both the floor and ceiling, vibrations travel through the structure and re-radiate as sound on the other side. Decoupling breaks that connection. Resilient channels or sound isolation clips mounted to studs before drywall is applied create a small physical gap that interrupts the vibration path.
According to wall assembly STC data, double-stud walls — where two separate stud bays are built with a small gap between them — are among the highest-performing acoustic wall assemblies available, capable of reaching STC ratings of 58 to 63 when combined with insulation and proper sealing.
For most residential renovations, resilient channels strike a practical balance between performance and cost. Double-stud walls are worth considering for media rooms, home offices, or bedrooms adjacent to mechanical spaces.
Fill Cavities with Acoustic Insulation
Empty wall cavities act as resonance chambers that amplify sound. Filling them with acoustic batt insulation (mineral wool or high-density fibreglass) absorbs sound energy inside the cavity before it can pass through. This pairs with mass and decoupling to form a complete assembly.
Mineral wool, such as Rockwool Safe’n’Sound, is commonly specified for interior partitions in high-performance renovation projects. It handles both acoustic and thermal performance, making it a natural fit when planning an energy retrofit alongside cosmetic work.
Seal Every Penetration
Electrical boxes, pot lights, plumbing runs, and HVAC duct penetrations all create gaps in wall and ceiling assemblies. Each one is a path for sound to bypass everything else you’ve built into the system. Acoustic putty pads around electrical boxes, back-to-back outlet spacing on opposite studs (never sharing a cavity), and acoustic sealant at all perimeters are standard practice on well-executed noise-reduction scopes.
Reducing Impact Noise Between Floors
Impact noise from footsteps or dropped objects requires a different approach than airborne sound control. The vibration originates at the floor surface and transfers directly into the structure. Treating only the ceiling below rarely solves the problem.
Underlayment and Floor Assembly
Acoustic underlayment beneath hardwood, engineered wood, or tile floors creates a cushioning layer that absorbs impact before it enters the subfloor. The performance difference between basic foam underlayment and a high-density acoustic underlayment is significant, particularly for footfall noise in multi-level homes.
Resilient Ceiling Systems Below
When the floor above can’t be fully addressed, installing a resilient ceiling system below is the next best option. This involves mounting resilient channels or hat channels perpendicular to the joists, then hanging drywall from those channels rather than directly from the structure. Combined with insulation in the joist cavity, this reduces both impact and airborne transmission through the floor-ceiling assembly.
Impact Insulation Class (IIC) ratings measure floor-ceiling assembly performance against impact noise, separate from STC. As noted in IIC rating guidance for floor assemblies, a combined floor-ceiling assembly targeting both IIC 50+ and STC 50+ is a reasonable benchmark for comfortable multi-storey living in a residential renovation context.
Acoustic Performance by Area: A Comparison
| Space Type | Primary Noise Concern | Recommended Approach | Priority Level |
| Master bedroom | Airborne (hallway, adjacent rooms) | Acoustic batt + resilient channel + 2 layers drywall | High |
| Home office | Airborne (calls, meetings) | Decoupled framing + mineral wool + sealed penetrations | High |
| Media room | Airborne (bass, dialogue) | Double-stud wall + MLV + floating floor system | Very high |
| Upper-floor living to lower bedroom | Impact (footsteps) | Acoustic underlayment + resilient ceiling below | High |
| Laundry / mechanical room | Mechanical vibration + airborne | Isolated framing + dense insulation + vibration mounts | Medium–high |
Step-by-Step: Building Acoustic Separation Into a Wall During Renovation
- Identify the priority zones early. Before framing begins, map which rooms need the highest acoustic separation: bedrooms, home offices, media rooms, rooms adjacent to mechanical spaces.
- Plan penetration locations carefully. Avoid placing electrical outlets back-to-back on the same stud bay. Route HVAC away from acoustic-sensitive walls where possible.
- Install resilient channels or isolation clips. Mount them horizontally across studs before drywall goes up. Ensure channels don’t touch the perimeter framing, which would short-circuit the decoupling.
- Pack the cavity with mineral wool. Fill the entire stud bay. Partial fill leaves air space that reduces performance.
- Apply first drywall layer and add damping compound. Use a viscoelastic damping compound between layers to convert sound energy into heat rather than letting it pass through.
- Apply second drywall layer, offset from the first. Stagger seams so they don’t align with the layer below.
- Seal all perimeters and penetrations. Apply acoustic sealant at the floor, ceiling, and any wall junctions. Install acoustic putty pads inside all electrical boxes.
Common Mistakes That Undermine Acoustic Work
- Installing resilient channels and then driving screws through them into the studs, which defeats the decoupling entirely.
- Leaving the top plate unsealed where the wall meets the ceiling, creating a continuous flanking path through the structure.
- Using standard foam underlayment on hardwood instead of a rated acoustic product, then being surprised by footfall noise.
- Treating only one surface (just the wall, or just the ceiling) while leaving flanking paths through floors, shared framing, or HVAC ducts unaddressed.
- Installing recessed pot lights in a ceiling below a bedroom without acoustic-rated housings, creating direct sound paths through the assembly.
- Leaving the scope of acoustic work undefined until late in the project, after structural and mechanical decisions have already been made.
How Acoustic Work Fits Into a Large-Scale Renovation
For homeowners on the North Shore undertaking a significant renovation, acoustic performance is most cost-effective when it’s built into the project scope from the start. Walls that need to come down for layout reconfigurations, structural changes, or mechanical upgrades are already open, which removes the labour cost barrier to proper acoustic detailing.
The same wall cavity that benefits from acoustic batt insulation also benefits from thermal insulation upgrades. Mineral wool products handle both functions. When a renovation already targets whole-home envelope upgrades, adding acoustic performance to the scope rarely requires a separate mobilization or significant additional budget.
Acoustic upgrades added during an active renovation, when walls are already open and trades are on site, typically cost a fraction of what the same work would cost as a standalone retrofit. According to soundproofing cost data, doing the work the first time during construction can eliminate about half the cost compared to retrofitting the same advanced methods after the fact.
At Kennedy Construction, large-scale renovations often involve complete interior reconfigurations where walls, ceilings, and floors are being rebuilt. That scope creates the right conditions to address acoustic performance properly alongside wellness-focused renovation priorities that North Shore homeowners increasingly ask about.
Frequently Asked Questions
How do you reduce noise between rooms?
The most effective approach combines three elements: adding mass (thicker or double-layer drywall), decoupling the framing (resilient channels or isolation clips), and filling wall cavities with acoustic batt insulation. Sealing all penetrations is equally important, since small gaps around outlets or plumbing can allow significant sound to bypass even a well-constructed wall assembly.
How can you soundproof the walls between rooms?
During a renovation with open walls, the best method is to install mineral wool insulation in the stud cavities, mount resilient channels to the studs before drywalling, and apply two layers of drywall with a damping compound between them. Seal all perimeter gaps and electrical penetrations with acoustic sealant and putty pads. For spaces that need the highest performance, such as media rooms or home offices, a double-stud wall assembly raises acoustic separation considerably.
How do you stop sound from travelling from one room to another?
Sound travels through walls, floors, and ceilings simultaneously, and also via flanking paths through shared framing and mechanical systems. Stopping it effectively means treating all surfaces in the room, not just one wall, and sealing every gap. Even a small unsealed gap around a pipe or light fixture can allow a disproportionate amount of sound to pass through an otherwise well-built assembly.
How can you soundproof between floors to reduce noise?
Floor-to-ceiling noise reduction requires treating both surfaces of the assembly. Acoustic underlayment under finished flooring reduces impact transmission at the source. A resilient ceiling system below, with insulation in the joist cavity and hat channels separating the drywall from the structure, addresses both impact and airborne sound. Addressing only the ceiling below without the floor above typically delivers limited results for footfall noise specifically.
What is the cheapest way to soundproof between floors?
The lowest-cost approach that still delivers meaningful results is acoustic underlayment beneath the finished floor surface, combined with acoustic batt insulation in the joist cavity. This doesn’t require decoupling the ceiling below and can be installed during a flooring replacement. The trade-off is lower overall performance compared to a full resilient ceiling system. For a home where renovations are already planned and the floor is being rebuilt anyway, the incremental cost of doing the full assembly correctly is usually the better long-term value.
Plan the Acoustic Work Before the Walls Close
Noise between rooms is one of the most common livability complaints homeowners raise after a renovation, and one of the most preventable. The decisions that determine acoustic performance are all made early, during structural and framing stages, not at finishing. Once drywall is up and painted, the practical options narrow significantly.
For homeowners on the North Shore planning a large-scale renovation, a home addition, or a full interior reconfiguration, this is the moment to address it. Kennedy Construction has over 20 years of experience building major residential projects in North Vancouver, West Vancouver, and the surrounding communities, with a track record that includes 8 HAVAN Awards and 1 Georgie Award. If acoustic performance matters to you in your next project, get in touch with the Kennedy Construction team to discuss how it fits into your renovation scope from the start.
