Thermal Bridging in Homes: What It Is and How High-Performance Custom Builds Prevent It
Thermal bridging in homes occurs when a highly conductive material, most often wood or steel framing, creates a direct path for heat to bypass insulation and escape through the building envelope. The result is higher heating bills, cold spots on interior walls, and moisture problems that quietly damage structure over time. For homeowners in North Vancouver and West Vancouver planning a custom home or major renovation, understanding and eliminating thermal bridges is one of the most impactful decisions you can make for long-term comfort and efficiency.
Key Takeaways
- Thermal bridging happens when framing members conduct heat around insulation, not through it, reducing real-world wall performance significantly.
- Older homes on the North Shore are especially vulnerable because their envelopes predate modern continuous insulation requirements.
- Continuous exterior insulation, advanced framing, and thermally broken connections are the primary prevention strategies used in high-performance builds.
- Adding insulation between studs alone does not fix thermal bridging, and many homeowners discover this only after a renovation falls short of expectations.
- A major renovation or custom home build is the most cost-effective window to address thermal bridges, because walls are already open and proper detailing is far cheaper than retrofitting later.
- Kennedy Construction incorporates building envelope best practices into large-scale renovations and custom homes across the North Shore.
Things You Must Know
1. Cavity Insulation Alone Leaves Thermal Bridges Intact
Many homeowners assume that upgrading batt or spray-foam insulation between studs will fix heat loss. It improves cavity R-value, but every framing member running through the wall assembly still conducts heat directly to the outside. Depending on framing density, those structural members can account for a substantial share of total wall heat loss even when cavities are fully insulated. Eliminating thermal bridging requires a strategy that addresses the framing itself, not just the spaces between it.
2. North Shore Homes Built Before the 1990s Are Almost Universally Affected
Building codes in British Columbia did not require continuous insulation at the wall exterior until relatively recent updates under the BC Energy Step Code. Most homes in North Vancouver, West Vancouver, and surrounding communities built before the 1990s were constructed with standard framed walls and no thermal break between the framing and the outdoors. If your home is in this category, thermal bridging is not a question of whether it exists, only of how much it is costing you in energy and long-term durability.
3. Moisture Damage Is Often the Bigger Risk
Cold framing members attract condensation from warm interior air, especially in kitchens, bathrooms, and exterior wall assemblies. Over time, that condensation drives moisture into the structure, which can lead to mold growth and wood decay inside wall cavities, often without visible signs until the damage is already significant. Addressing thermal bridging during a renovation protects both the performance of the new assembly and the structural integrity of the home for decades ahead.
What Exactly Creates a Thermal Bridge?
A thermal bridge forms wherever a material with high thermal conductivity runs continuously from the warm interior side of a wall, floor, or roof assembly to the cold exterior side. In standard residential construction, the most common culprits are wood studs, steel framing, rim joists at floor levels, headers above windows and doors, and structural connections like lintels and ties.
The physics are straightforward. Insulation works by trapping air in a matrix of fibers or foam cells, slowing heat transfer dramatically. Solid wood or metal conducts heat orders of magnitude faster than that insulation. So even a small framing member in contact with both sides of the assembly creates a shortcut that heat takes preferentially over the slower path through the insulated cavity.
In a conventionally framed wood wall, framing members typically occupy around 25 percent of the total wall area. According to hot-box measurements by Oak Ridge National Laboratory researchers, a 2×6 wall insulated with R-19 fiberglass batts delivers a whole-wall R-value of only R-12.8 when batts are installed perfectly — a reduction of roughly one-third compared to the insulation manufacturer’s rating alone — because the framing conducts heat around the insulated cavities.
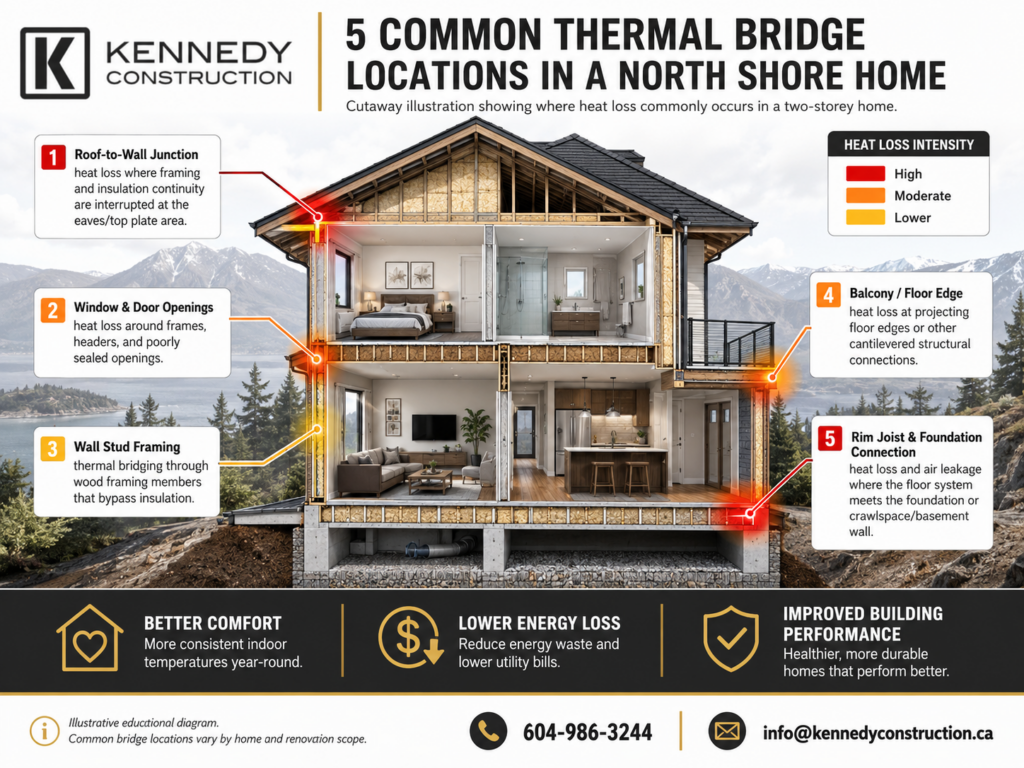
Where Thermal Bridges Hide in a Typical Home
Beyond studs, thermal bridging concentrates at predictable locations in residential construction. Knowing where to look shapes the scope of prevention work during a renovation or new build.
| Location | Why It Bridges | Common Signs |
| Exterior wall studs | Run from interior drywall to exterior sheathing | Cold stripes on interior walls in winter |
| Rim joists at floor levels | Structural wood exposed at exterior perimeter | Cold floors near exterior walls on upper storeys |
| Window and door headers | Heavy structural members with little to no insulation | Condensation at window frame edges |
| Balcony and deck connections | Steel or wood ledgers penetrate the envelope | Cold floors at balcony doors, moisture staining |
| Exterior corners | Stacked framing members reduce insulation depth | Cold corners, occasional mold at baseboard level |
How High-Performance Builds Prevent Thermal Bridging
Prevention requires a deliberate strategy at the design and framing stage. There is no single fix that applies universally, but the following approaches are used in combination on high-performance homes in North Vancouver and across the region.
Continuous Exterior Insulation
The most effective thermal bridge prevention wraps rigid insulation continuously across the outside face of the framing before cladding is applied. This layer covers the framing entirely, eliminating the direct conduction path. Common materials include rigid mineral wool and rigid foam board. Thickness varies by target performance level and local code requirements under the BC Energy Step Code.
Exterior insulation adds R-value not only by increasing thickness but also by eliminating the thermal bridging that occurs where framing materials transfer heat, and the Building America Solution Center notes that continuous rigid insulation is the primary construction solution for addressing this problem in wood- and metal-framed exterior walls.
Advanced Framing Techniques
Advanced framing, sometimes called optimum value engineering, reduces the total amount of framing in a wall assembly by widening stud spacing, eliminating redundant corner framing, and using insulated headers. Fewer framing members means fewer thermal bridges and more cavity space for insulation. This approach works best at the design stage of a custom home or major addition, where the framing plan can be drawn for performance from the start.
Thermally Broken Connections
Structural connections that penetrate the envelope, such as balcony ledgers, cantilevered slabs, and through-wall ties, require a thermal break at the point of penetration. Proprietary thermally broken connectors are now available for most standard applications and are specified in high-performance builds to prevent the concentrated heat loss these connections would otherwise create.
How to Identify Thermal Bridging Before a Renovation
A thermal imaging inspection is the most reliable diagnostic tool. An infrared camera captures heat loss patterns across wall surfaces, showing precisely where framing members are conducting heat and where insulation gaps or deficiencies exist. For homeowners planning a whole-home envelope upgrade, this inspection shapes the scope of work and helps prioritize where intervention will have the greatest impact.
- Schedule a thermal imaging inspection during cold weather, when temperature differences between inside and outside make heat loss patterns visible.
- Review the results with a contractor experienced in building science and envelope performance, not just insulation installation.
- Identify the locations where bridging is most severe, typically rim joists, headers, and framing-dense corners.
- Incorporate targeted thermal break details into the renovation scope while walls are open.
- After work is complete, consider a follow-up blower door test or infrared scan to verify performance improvements.
Common Mistakes Homeowners Make with Thermal Bridging
- Upgrading cavity insulation and stopping there. Better batts or spray foam between studs improve the cavity but leave every framing member as a bridge. The walls feel better but the expected performance gains never fully materialize.
- Skipping the rim joist. Rim joists are among the most significant thermal bridges in a two-storey home and are frequently overlooked in renovation scopes. They are also among the easiest to address when the work is already underway.
- Not specifying thermally broken connections for decks and balconies. A new deck ledger bolted through an otherwise well-insulated wall undoes much of the work on that wall section. Thermally broken hardware is available and should be standard in any high-performance project.
- Treating thermal bridging as a cosmetic issue. Cold spots and condensation are symptoms of a structural heat loss problem. Paint and vapor barriers mask the evidence; addressing the bridge eliminates the cause.
- Waiting until a later phase. Once walls are closed, reopening them to add continuous exterior insulation or correct framing details costs significantly more. The renovation or new build stage is the right time.
Thermal Bridge Prevention: Strategy Comparison
| Strategy | Best Application | Addresses Bridging Directly? |
| Cavity insulation upgrade | Improving insulation in wall cavities | No, framing bridges remain |
| Continuous exterior insulation | New builds and full envelope renovations | Yes, covers framing entirely |
| Advanced framing | Custom homes and additions from design stage | Yes, reduces framing members |
| Thermally broken connectors | Structural penetrations, balconies, ledgers | Yes, at point of penetration |
| Interior insulated furring | Retrofit when exterior work is not feasible | Partially, with some space loss |
BC’s Energy Step Code establishes a tiered performance framework requiring progressively higher levels of energy efficiency at each step, with envelope performance as a central metric. According to the Province of British Columbia, the Step Code sets performance requirements for new buildings that increase at each tier, and a high-performance building envelope — featuring continuous insulation and minimal thermal bridging — is the recognized path to meeting the upper steps, making high-performance envelope detailing an increasingly standard expectation in new construction rather than an optional upgrade.
For homeowners also considering airtightness improvements alongside thermal bridge prevention, both strategies work best when designed together. A tight, well-insulated envelope delivers meaningfully better results than either measure in isolation.
Frequently Asked Questions
What is thermal bridging and why does it matter in older North Shore homes?
Thermal bridging occurs when a conductive material, most commonly wood or steel framing, creates a direct path for heat to bypass insulation and escape through walls, roofs, or floor assemblies. In older homes across North Vancouver and West Vancouver, this is especially common because building envelopes were constructed before modern energy standards required continuous insulation. The result is cold spots on interior walls, elevated heating bills, and moisture problems that can quietly damage the structure over time. Understanding thermal bridging is the first step toward a high-performance renovation that delivers the comfort and efficiency you are actually investing in.
Is fixing thermal bridging worth the cost during a major renovation?
For homeowners planning a significant renovation, particularly a whole-home upgrade, addition, or complete modernization, addressing thermal bridging is one of the highest-value improvements you can make to the building envelope. Eliminating thermal bridges through continuous exterior insulation or advanced framing techniques reduces ongoing heating and cooling costs for as long as you own the home, which matters most to homeowners planning to stay long-term. It also protects the structural integrity of walls and roof assemblies by reducing condensation-driven moisture. When walls are already open during a large-scale renovation, the incremental cost of doing it right is far lower than retrofitting later.
How do I know if my home has a thermal bridging problem before starting a renovation?
The most reliable method is a thermal imaging inspection, where an infrared camera reveals heat loss patterns through walls and at structural framing locations. Visible clues include cold interior wall surfaces in winter, frost or condensation forming at window frames and wall corners, and heating systems that run longer than expected for the home’s size. In many North Vancouver and West Vancouver homes built before the 1990s, thermal bridging is nearly guaranteed given how those envelopes were originally constructed. A contractor experienced in building envelope improvements can evaluate your home and recommend the right scope of work as part of the renovation planning process.
What is the difference between adding insulation and fixing thermal bridging?
They are related but not the same, and confusing them is one of the most common reasons homeowners do not get the performance improvement they expect after a renovation. Adding insulation between studs increases the R-value of the cavity, but the framing members themselves still conduct heat around that insulation. Addressing thermal bridging properly typically requires continuous insulation applied to the exterior of the framing, thermally broken connections at structural penetrations, or advanced framing strategies that reduce the number of framing members in the wall assembly. A contractor who understands building science will distinguish between these approaches and recommend what is appropriate for your specific home and renovation scope.
Should I fix thermal bridging during a home addition, or can it wait?
A home addition is one of the best opportunities to address thermal bridging, because the new assembly is being built from scratch and proper detailing costs far less at the design and framing stage than it does as a retrofit. If the addition connects to an existing envelope that also has bridging issues, a skilled contractor will plan the junction carefully to avoid creating new weak points where the old and new assemblies meet. Waiting typically means reopening finished walls and ceilings, which adds significant cost and disruption. For homeowners investing in a long-term addition, whether a second storey, rear addition, or family room expansion, building the envelope correctly from the start pays dividends in comfort and operating costs for decades.
Building a Home That Actually Performs
Thermal bridging is one of those issues that sits quietly inside walls for years, steadily costing homeowners in energy bills and structural wear without announcing itself clearly until the damage is done. For homeowners on the North Shore who are already committing to a major renovation or custom build, it makes every practical sense to address it while the opportunity is open.
Kennedy Construction has built its reputation over more than 20 years on large-scale renovations and custom home construction across the North Shore, with a team that understands building science, envelope performance, and the long-term value of doing the technical work correctly the first time. If you are planning a substantial project in North Vancouver, West Vancouver, or surrounding communities, the team is ready to walk through your options.
Call Kennedy Construction at 604-986-3244 to discuss your project and get a professional assessment of your home’s envelope performance needs.